Table of Contents
Using a continuous glucose monitor (CGM) makes it way easier to track your blood sugar day and night, and you don’t have to deal with endless finger pricks. To get the most out of your CGM, make sure you’re placing the sensor right, checking your numbers regularly, and actually responding to what your glucose readings tell you.
This is how you start to see what your daily habits and food choices are really doing to your blood sugar.
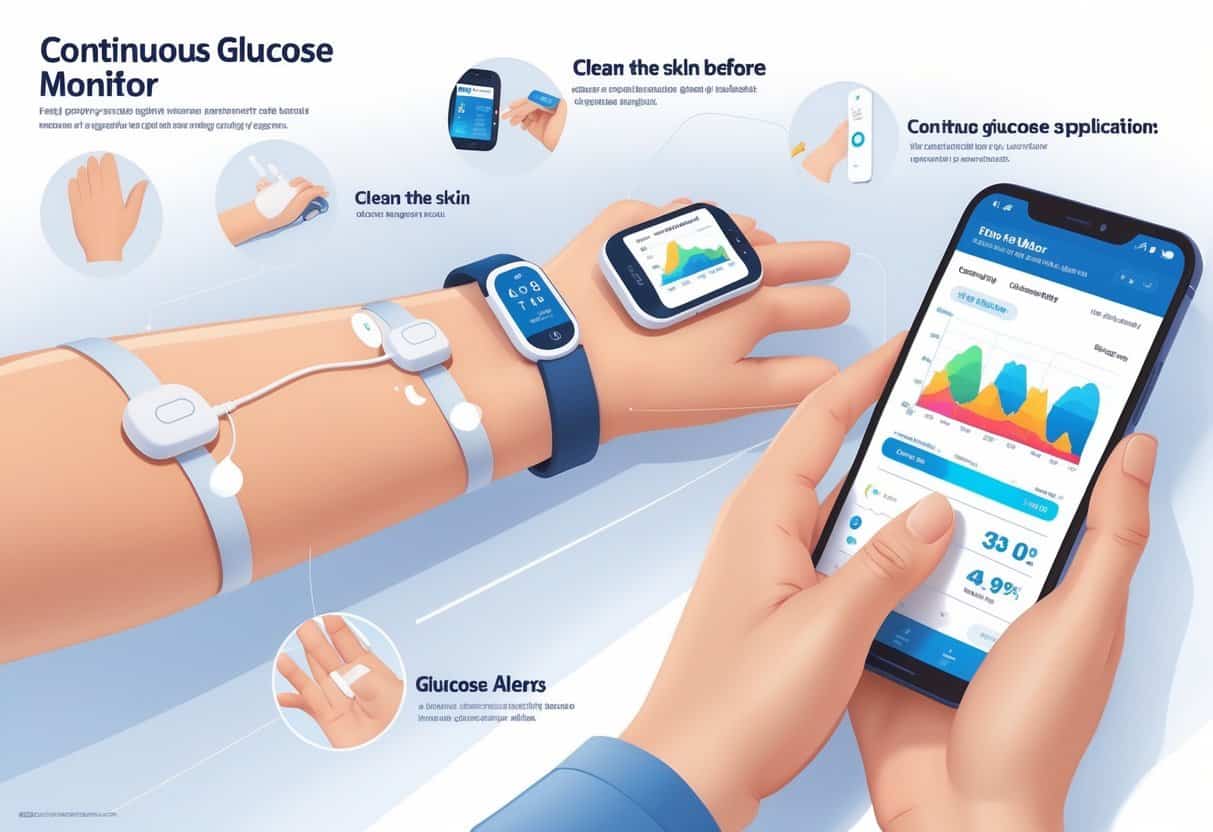
Getting started with a CGM means inserting a tiny sensor under your skin—usually on your arm or belly. Once it’s in, the device keeps measuring your glucose and sends updates to a reader or your phone.
Watching your numbers over time helps you spot highs and lows before they get out of hand. That means you can tweak what you’re doing right away.
Key Takeways
- Place your sensor carefully and check your data often for best results.
- Understanding your patterns leads to smarter choices.
- Sharing CGM info with your care team makes diabetes management more effective.
What Is a Continuous Glucose Monitor (CGM)?
A continuous glucose monitor is a gadget you wear to keep tabs on your blood sugar, all day and all night. It gives you updates in real time, so you don’t have to prick your finger as much.
Knowing how a CGM works—and how it stacks up against old-school methods—can help you figure out if it’s a good fit.
How CGMs Work
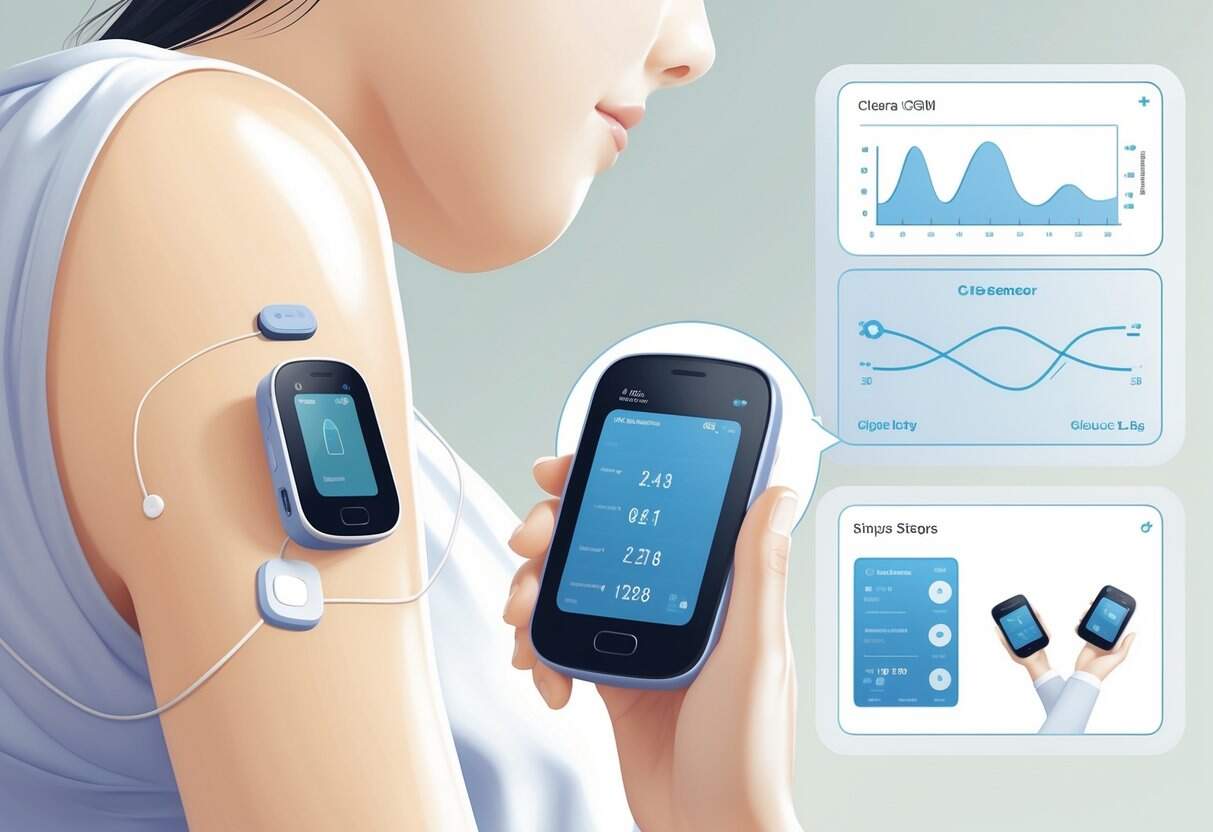
A CGM uses a small sensor that sits just under your skin, usually on your arm or belly. This sensor checks the glucose in the fluid around your cells and sends the numbers to a receiver or your phone.
The device updates your readings every few minutes. Instead of just seeing one number, you get a whole stream of data.
That means you can spot trouble before it happens and adjust your food, activity, or meds as needed.
Sensors last anywhere from 7 to 14 days. Some need fingerstick calibrations, but honestly, a lot of the newer ones don’t.
Types of CGM Devices
There are a few options out there, depending on what you want. The two main types are professional CGMs and personal CGMs.
- Professional CGMs are set up by your doctor and worn for a short time. Your healthcare provider looks over the results.
- Personal CGMs are for everyday use, so you can check your numbers in real time and get alerts if things change fast.
Some CGMs come with a separate reader, but most now connect straight to your phone. That makes it super convenient.
CGMs vs. Traditional Glucose Monitoring
Traditional monitoring means pricking your finger and testing a drop of blood. You get a single number, and you’ll probably have to do this several times a day.
CGMs cut down on fingersticks by giving you a constant stream of data. You can see trends over hours or days, not just snapshots.
Sometimes, though, you’ll still need a fingerstick to double-check the CGM, especially if your numbers are changing quickly or something seems off. CGMs are great, but they don’t totally replace the old method.
Benefits of Using a CGM
Using a CGM gives you a steady stream of info about your blood sugar. This helps you make smarter decisions about food, exercise, and insulin.
It also lowers your risk of dangerous highs and lows, and keeps your glucose closer to your target range.
Improved Glucose Control
With a CGM, you see your glucose in real time. If things start to go off track, you can act fast.
You get to see how your body reacts to different foods or activities, which helps you fine-tune your routine.
The device saves your data, so you and your doctor can spot patterns and make better adjustments. That’s huge for avoiding long-term complications.
Reduction of Hypoglycemia and Hyperglycemia
A big plus with CGMs: alerts. You can set them to warn you if your blood sugar drops too low (hypoglycemia) or goes too high (hyperglycemia).
Early warnings mean you can do something before it gets dangerous.
Low blood sugar can make you dizzy or confused—or worse. High blood sugar can damage your organs over time. CGMs help you avoid both better than fingersticks alone.
Time in Range Monitoring
“Time in range” means how long your glucose stays in your target zone. CGMs make it easy to track this.
More time in range is linked to better outcomes. Your CGM can show daily, weekly, or monthly reports, so you see how you’re doing.
If you notice you’re out of range more often, you can change your habits or treatment. It’s a real advantage for staying healthier.
Getting Started With CGM
There are a few steps before you start tracking your glucose with a CGM. You’ll need to see if CGM is right for you, get a prescription, and pick a device.
Patient Selection
You might be a good fit for CGM if you have type 1 diabetes, use insulin for type 2, or have gestational diabetes. CGM can also help some folks with prediabetes who want to keep a closer eye on things.
Your doctor will look at your type of diabetes, treatment, and daily routine. CGM works best if you use insulin or need lots of blood sugar checks.
People with type 2 who don’t use insulin might still benefit, but it really depends on your goals and your doctor’s advice. Not everyone needs a CGM.
Prescription and Prior Authorization
You’ll need a prescription from your healthcare provider to get a CGM. The script will list your medical info and what device is recommended.
A lot of insurance plans want prior authorization, so your doctor may have to send extra paperwork. Be ready to share your diabetes history, recent glucose numbers, and medication list.
This process can take a few days or even weeks. Sometimes you’ll have to follow up with your provider or insurance company. Once you’re approved, you can get started.
Choosing the Right CGM Device
There are different CGMs out there, each with its own features—like how long the sensor lasts, whether you need to calibrate, and how you see your data.
When picking a device, think about:
- Sensor wear time (some last 7 days, others up to 14)
- Calibration needs (some require fingersticks, others don’t)
- Compatibility with your phone or pump
- Cost and insurance coverage
Your doctor can help you decide what works best for your lifestyle and budget. Some devices have alerts for high or low glucose, which can be a lifesaver.
Device Setup and Sensor Insertion
Getting your CGM set up right—and inserting the sensor properly—makes a big difference in accuracy. You’ll want to put the sensor on clean skin, follow the steps for your device, and calibrate if needed.
Installing Your CGM Sensor
Start by cleaning the area where you’ll put the sensor. Use soap and water, then dry your skin completely.
Skip lotions or oils—they mess with the adhesive.
For devices like the Freestyle Libre or Dexcom G6, carefully open the sensor without touching the sticky part. Place the applicator flat against your skin.
Press down until the sensor is inserted. The Dexcom G6 will click when it’s in, and the Freestyle Libre fits snugly (sometimes with an overpatch).
Don’t try to reuse a sensor once it’s out. Always follow your device’s instructions to avoid issues.
Sensor Placement Tips
Pick a spot recommended by your CGM brand—usually the back of your upper arm (Libre) or your belly (Dexcom G6).
Stay away from spots near bones, scars, or where clothes rub a lot.
Rotate where you put the sensor each time to avoid skin problems. You can mark or remember where you used last.
If there’s hair, trim it first. Hair can mess with how well the sensor sticks or works.
Don’t put the sensor somewhere it’ll get squished, like under a seat belt or sports gear. That keeps your readings accurate and the sensor lasting longer.
Initiating Device Calibration
Some CGMs, like the Dexcom G6, don’t need fingerstick calibration—they just start working. Others, especially older models, may ask for a blood glucose reading from a fingerstick.
If calibration is needed:
- Use a fresh lancet for a blood drop.
- Test with a reliable meter.
- Enter the result into your CGM as directed.
Calibration usually happens right after you insert the sensor or during the first day. Doing this step right helps your CGM stay accurate.
Daily Use and Data Interpretation
To get the most from your CGM, check your glucose often, look for patterns, and set alarms for highs and lows. This helps you react fast and keep things under control.
Checking Glucose Readings
Check your readings a few times a day so you know where you stand. Most CGMs update every 5 to 15 minutes, giving you almost real-time info.
Look at your current number and see if you’re in your target range.
Your device or app usually makes this clear, and many let you download your data with software like LibreView. Reviewing a couple weeks’ worth of data (aim for at least 70% coverage) gives you better insights.
If a reading seems off, double-check with a fingerstick.
Understanding Glucose Trends
Trends show how your blood sugar changes over time. Your CGM will usually display arrows or graphs.
An upward arrow means your glucose is rising; downward means it’s dropping.
Watch for spikes after meals or drops after exercise. Seeing these patterns helps you figure out what’s affecting your numbers.
You can use apps or software to see more detailed reports, including how often you’re “in range” and when you’re not.
Setting Glucose Alarms
Glucose alarms help you act fast if your numbers go out of range. Most CGMs let you set high and low limits, and the device will alert you with a sound or vibration.
Pick alarm settings with your doctor so they match your health goals. Alarms are especially handy at night or during activities when you might miss symptoms.
Make sure your alarms are loud or strong enough to get your attention. Adjust them as your targets or lifestyle change.
Integrating CGM Data Into Diabetes Management
Using your CGM data wisely means spotting patterns, talking with your healthcare team, and making smart adjustments to your meds.
Interpreting Patterns and Making Adjustments
Look for repeating highs or lows at certain times. These patterns can show where your plan might need tweaks, like changing meal times or insulin doses.
Use your CGM to see how food, exercise, or stress affects your blood sugar. If you drop after exercise, maybe you need a snack first.
Record trends and share them with your doctor. Regular reviews help you avoid dangerous swings.
Communicating With Healthcare Providers
Share your CGM reports often. Your provider might notice things you missed and can offer better advice.
Be upfront about how you’re taking meds and what your habits are. It helps your team give you more useful feedback.
Don’t be afraid to ask questions if you’re confused by your data. Good communication makes a huge difference.
Using CGM Data for Medication Management
CGM data can help you figure out the right insulin doses at different times. It can prevent overdosing or missing doses that cause swings.
If you see high numbers after meals, talk to your doctor about adjusting your insulin. If you’re going low, maybe you need less insulin or a snack.
Actively using your glucose data helps you keep your treatment on target and lowers your risk of complications.
Lifestyle Factors Affecting CGM Data
Your blood sugar can swing around a lot depending on your daily routine, what you eat, and how stressed you are. Getting a grip on how these things show up in your CGM readings makes glucose management a lot less mysterious.
Exercise and Physical Activity
Exercise usually lowers blood sugar because your muscles use up more glucose for energy. But not all workouts act the same way.
Aerobic activities like walking or cycling tend to drop your glucose in a steady, predictable fashion. High-intensity or resistance training, on the other hand, can actually spike your blood sugar for a bit due to stress hormones.
It’s kind of wild how your CGM will show these patterns as you move through your day. Watching your numbers during and after exercise helps you dodge lows, especially if you’re adjusting insulin or meds around activity.
Nutrition and Meal Timing
What and when you eat has a big impact on those post-meal sugar spikes. Foods loaded with simple carbs cause your glucose to shoot up fast.
Your CGM will make it obvious how quickly your sugar rises and how long it sticks around. Eating at weird hours can sometimes make the dawn phenomenon worse—that’s the early morning glucose rise that’s tough to manage.
Trying out smaller, more balanced meals or snacks can help keep things more level. Tracking your CGM data can nudge you toward choices that actually fit your life and your glucose goals.
Managing Stress
Stress is sneaky—it pushes your blood sugar up through hormones like cortisol and adrenaline. Sometimes your CGM will show higher numbers even if you haven’t eaten or exercised.
Chronic stress can really mess with your glucose control. If you notice your numbers climbing during tough times, it might be time to try out some relaxation tricks or tweak your daily routine.
Watching your CGM during stressful moments can teach you a lot about your own patterns. That info can come in handy for self-care or when talking things over with your doctor.
Special Considerations in CGM Use
CGM isn’t always one-size-fits-all. Things like pregnancy, kidney trouble, or other health issues can change how you read and react to your glucose data.
Pregnancy and Gestational Diabetes
If you’re pregnant or dealing with gestational diabetes, keeping a close eye on glucose is extra important. Your insulin needs can shift fast during pregnancy.
CGM lets you spot trends in real time, so you can adjust your diet, exercise, or insulin as needed. Glucose targets during pregnancy are tighter, so your provider will give you specific ranges to aim for.
It’s still smart to double-check with fingerstick tests, especially if your glucose is changing quickly or you’re feeling off.
Chronic Kidney Disease and Heart Disease
With kidney disease, your body doesn’t clear insulin the same way, so glucose control gets trickier. Heart disease makes stable glucose even more important to avoid complications.
CGM helps you catch swings that might otherwise slip by unnoticed. That way, you can act fast to prevent dangerous highs or lows.
If you’ve got these conditions, make a habit of sharing your CGM data with your care team. They might adjust your meds or treatment plan based on trends, not just single numbers.
Cancer and Other Health Issues
Cancer treatments, stress, and steroids can all throw your blood sugar for a loop. CGM gives you a continuous window into what’s happening, which is a relief when things get unpredictable.
Other chronic illnesses can mess with glucose too. It’s a good idea to use your CGM data as just one piece of your bigger care puzzle.
Always double-check surprising CGM readings with a fingerstick, especially if you’re dealing with health issues that might throw off sensor accuracy.
Troubleshooting Common CGM Challenges
CGMs are game-changers, but they’re not perfect. Sometimes you’ll hit bumps with sensors, low blood sugar alerts, or those dreaded night-time drops.
Sensor Malfunctions
If your sensor starts acting weird or stops altogether, first check where you placed it. Make sure the spot is clean and dry—sweat or lotion can mess things up.
If it falls off or loses connection to your phone or receiver, try reattaching or restarting. Sometimes a simple restart will clear up the issue.
Skin irritation from the sticky stuff is pretty common. If that’s a problem, try a barrier film or switch up your sensor site.
Having a backup sensor ready can save you from missing out on important glucose info.
Hypoglycemia Awareness
Low blood sugar can sneak up on you, especially with a CGM. Set your alarms at levels that actually work for you—loud enough to get your attention.
If you feel off but your CGM isn’t warning you, double-check with a fingerstick. CGMs sometimes lag behind real changes.
Watch for signs like sweating, dizziness, or irritability, and treat lows right away with fast-acting carbs.
Nocturnal Hypoglycemia
Night-time lows are scary because you might not notice them while you sleep. Set your CGM alarms just for overnight—vibrating ones help if you sleep through sounds.
Make sure your device is working and within range before you go to bed.
If you keep having night-time lows, talk to your doctor about tweaking your insulin or meal schedule.
Data Sharing and Technology Integration
Getting the most out of your CGM means connecting your data to the right people and tools. You can share readings with your care team, use apps to track trends, and even set up remote monitoring.
Data Sharing With Care Teams
You’ll need to give permission to share your CGM data. Most providers use systems like Libreview to securely upload and organize your readings.
Linking your data to your electronic health record (EHR) gives your provider easy access to both current and past glucose numbers. That can save time and catch issues earlier.
Decide what you’re comfortable sharing—it’s your info, after all.
Using Diabetes Apps and Software
Plenty of apps work with your CGM to show your numbers, trends, and send out alerts. Libreview is a popular choice for storing and analyzing data.
You can log meals, exercise, and meds in the same app, which helps you spot what’s causing highs and lows. Some apps even connect with other devices or let you add notes, so you’ve got everything in one spot.
Remote Monitoring Options
Remote monitoring lets family or caregivers keep an eye on your CGM data from afar. Secure sharing features in apps or platforms like Libreview make this possible.
It’s especially handy if you want someone to help look out for you overnight or when you’re alone. Your healthcare team can also review your data remotely before appointments, which saves everyone time.
To set it up, you or your clinic usually send an invite to share data that you accept in your app or online.
Program Implementation and Administrative Considerations
Starting a CGM program takes some real planning. You’ll need a solid workflow, staff who know the ropes, and buy-in from the folks upstairs.
Standardized Workflow Development
A clear, step-by-step workflow makes life easier for everyone. Map out each step—from picking the right patients to putting in the sensor.
Include things like getting prior authorization, booking appointments, and managing data downloads. Write down protocols for sensor placement, follow-ups, and troubleshooting.
Checklists or guides can keep the team on track. Consistency not only helps patients but makes billing less of a headache.
Staffing and Training Needs
Your staff should understand CGM devices and how to interpret the data. Pick team members to handle patient education, sensor setup, and data review.
Offer training on device use, common issues, and all that insurance paperwork. Regular updates are a good idea since devices and rules change constantly.
Having a CGM coordinator can keep things running smoother. A well-trained team means fewer mistakes and better support for patients.
Administrative Buy-In
You’ll need support from upper management to get funding and keep your CGM program running. Lay out the benefits—better patient care, more efficient billing, all that good stuff.
Share a plan with expected costs and staffing needs. Show how a standardized workflow and trained team help everyone reach their goals.
Ask for resources like dedicated staff and training budgets. Keeping administrators in the loop with updates helps keep their support strong.
Insurance, Billing, and Reimbursement
Figuring out insurance for your CGM can be confusing, but it’s worth it to avoid surprises. Knowing what your plan covers, how billing codes work, and how to get the best reimbursement saves time and money.
Navigating Health Insurance Coverage
Most insurance plans cover CGMs under durable medical equipment (DME), but it depends on your medical situation. You’ll probably need your doctor to prove it’s necessary.
Check if pre-authorization is needed—skipping this step can lead to delays or denials. Some plans only cover certain brands or types, so read the fine print.
Talk to your insurer and review your policy. Knowing your deductible and copays helps you budget for what’s ahead.
Understanding Billing Codes
Billing codes, or CPT codes, are how providers get paid for CGM services. The main ones are:
- 95250: Training and device setup
- 95251: Data analysis and interpretation
- 95249: Sensor insertion and replacement for personal CGM
Providers have to use these codes correctly to get coverage for things like setup and data review. Mistakes can slow down payment or lead to denials.
Sometimes, modifiers are needed to explain special situations. Double-check that your provider knows which codes your insurance wants.
Maximizing Reimbursement
To get the most out of your benefits, work closely with your healthcare team and insurer. Make sure your records clearly show why you need a CGM.
Ask your provider to use the right CPT codes and modifiers when submitting claims. Keep copies of paperwork and any explanations of benefits (EOBs) you get.
If a claim gets denied, don’t wait—appeal with more medical info. Some insurers also pay healthcare teams for managing your CGM data, which can help with care costs.
Staying on top of your billing statements and understanding your coverage helps you avoid surprise bills.
Working With Diabetes Educators and Specialists
Using a CGM well means teaming up with people who know their stuff. They’ll help you make sense of your numbers and figure out what to do next.
Role of Diabetes Educators
A diabetes educator is your go-to for learning how to use a CGM. They’ll show you how to put in the sensor, calibrate if needed, and handle common hiccups.
They’re also great at helping you spot trends in your data—so you know when to change up meals or activity to avoid highs and lows.
Expect advice tailored to your health and lifestyle. Educators help you set realistic glucose targets and explain what to do if you’re out of range. Their support can boost your confidence and make daily diabetes management a little less daunting.
Coordinating With Multidisciplinary Teams
When it comes to diabetes care, it’s rarely just you and your educator. There are doctors, dietitians, and nurses in the mix, all pitching in from their own angles.
Sharing your CGM data with everyone involved can really make a difference. It lets doctors tweak your meds with a bit more confidence.
Dietitians use that info too, adjusting nutrition advice so it actually fits your real life. It’s all about having the right info in the right hands.
Regular check-ins help keep things running smoothly. Make sure your team knows how to get your glucose data and actually uses it.
Sometimes, it feels like a lot, but this team setup can keep you moving toward your diabetes goals—without you having to guess what’s next.